Creating an External Requisition through the Requisition and Number Generator in My UW
Download the printable pdf version of these instructions
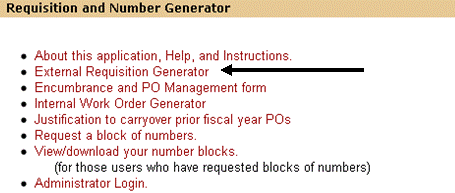
- This section of the application allows you to use the requisition generator to create and print an external requisition with a valid requisition number assigned to it. Begin by choosing “External Requisition Generator ” from the Main Menu.
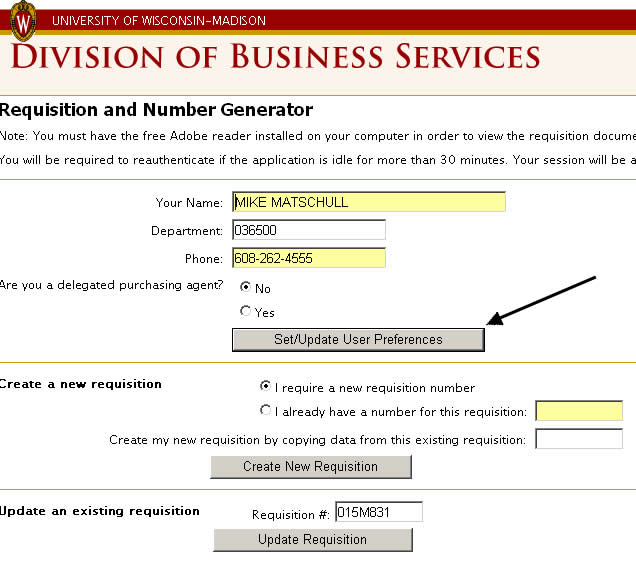
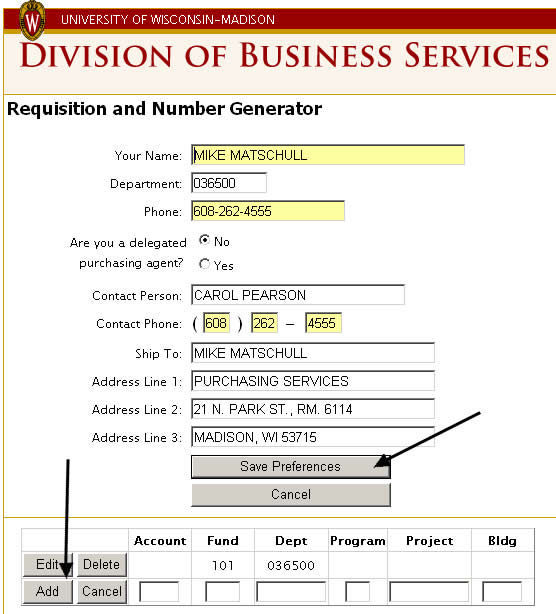
- The first time you enter the main menu of the application your name, Department, and phone will be blank. Begin by setting your preferences.
- Click "Set/Update User Preferences"
- Use this screen (shown below) to enter:
- your name
- Department ID in SFS coding
- phone number
- choose if you are a delegated purchasing agent (most will use the default "no") - if you are unsure, answer no.
- preferred contact person (full name)
- preferred ship-to address
- preferred Dept. Chairperson printed name
- preferred Dean or Director printed name
- preferred funding string(s)
- Be sure to click "Save Preferences" to save and go back to the main menu.
- Be sure to click "Add" to save your funding
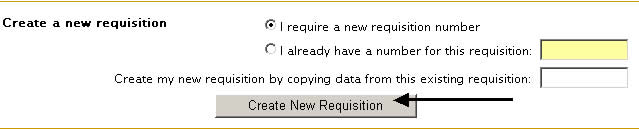
- Now you are ready to create a requisition. The default option is to create a new requisition with a new requisition number assigned by the system.
- If you already have a number for the requisition you can choose that option and enter the number in the space provided.
- If you know the number of a similar requisition to the one you will be creating, enter it in the box provided to copy the data from that existing requisition or PO (and save yourself some keying).
- Choose the "Create New Requisition" button to continue.
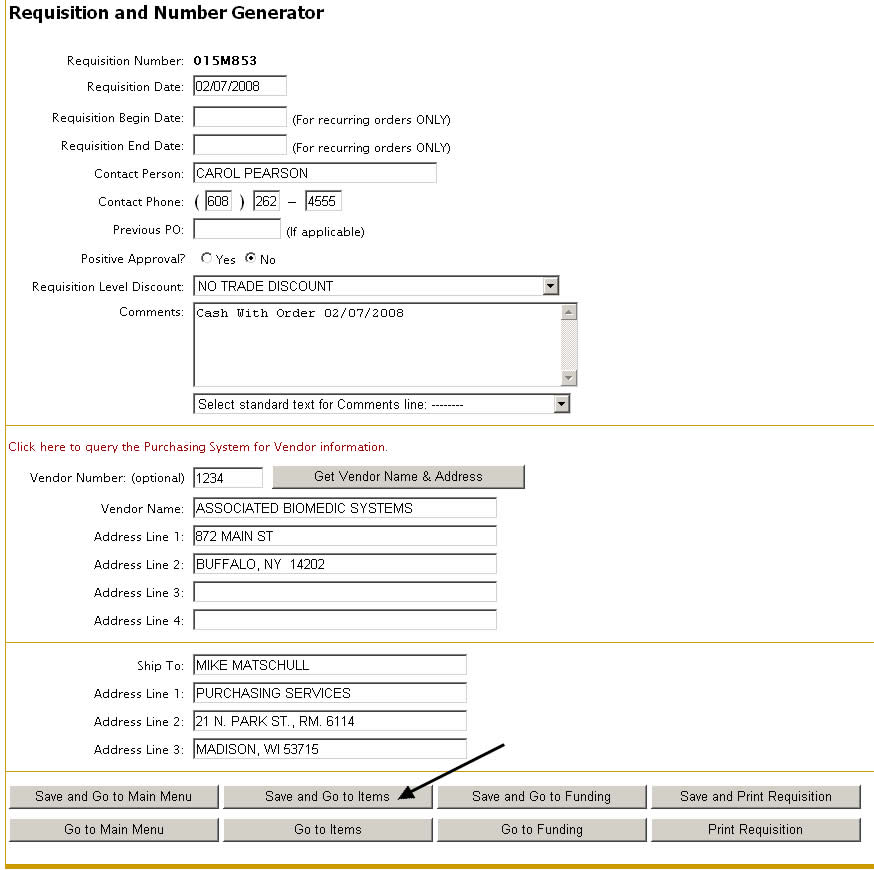
- The next screen allows entry of basic requisition information.
- your assigned (or entered) requisition number is displayed at the top
- today's date is defaulted into the Requisition Date field
- If you are entering a Continuing Order Requisition or COR, be sure that you change the date in this field to today’s date
- If you would like the order to be a blanket order (i.e. continuing over a span of time), fill in the Begin and End dates (note: dates can only span a period of 12 months).
- If placing a one time order, no dates are required in these fields.
- If dates are filled in, you will receive a Continuing Order Requisition (COR) reminding you that your order is expiring about 3 months before the ending date on the order.
- If you are entering blanket order dates or processing a COR, be sure that your funding is valid for the entire date range of the order, e.g. don’t set an end date beyond your project funding end date.
- enter or make any needed changes to the default contact person name and phone. Be sure to use a full first and last name. The contact person should be someone who is able to answer questions about your order from both the vendor and Purchasing. A copy of the invoice will be sent to this person if positive approval is requested.
- if you require positive approval (where invoices will be sent to you for approval before payment) choose yes (the default value is no). Only choose yes if this feature is necessary as it greatly slows down the time for Accounting to pay invoices.
- choose a discount from the drop down menu if needed (the default is no discount). If you choose a discount here, it will be applied to the entire requisition total, so for a 10% discount off of the entire requisition total, you would choose 10% Trade Discount from the drop down box.
- enter any comments or information you would like Purchasing or the vendor to know about your order or choose from the standard comments listed in the dropdown. You can enter up to 2000 characters in the comments field.
- If a check needs to accompany your order, please be sure that is clearly communicated in the comments field.
- The comments field should only include instructions to the vendor, Purchasing, and/or Accounting. No descriptions of the goods or services being ordered should be included here.
- It is not necessary to describe the beginning and ending dates of your funding source in this section.
- If you are copying and pasting into this field from another document, be sure that no special characters or scientific characters are pasted into the requisition.
- If you would like the Dept. Chairperson and Dean or Director names to be pre-filled in the Printed Name field in the signature block on the printed copy of the requisition, enter those names in the fields provided. These names can also be pre-populated from your preferences.
- enter the vendor name and address. If you know the vendor number (or have looked it up using the link), enter it and click the "Get" button to retrieve the correct vendor information without having to key the name and address
- If you choose to enter a vendor number and use the “Get” button, you should not make any changes to the vendor name or address. These will not be captured in the database or on your order. Only the initial information associated with the vendor number will be used. If an update needs to be made to the stored information, contact Purchasing at purch@bussvc.wisc.edu
- make any needed changes to your default ship-to address or enter your ship-to address in these fields
- A ship-to address with a valid zip code must be entered for the order to be able to be sent to the vendor. It cannot be left blank.
- If the requisition is for services, the ship-to address should be for the location at which the services will be performed.
- Be sure to click "Save and Go to Items" to save your information and continue. If you do not, your information or changes will be lost. Use the second set of buttons to navigate to other pages without saving.
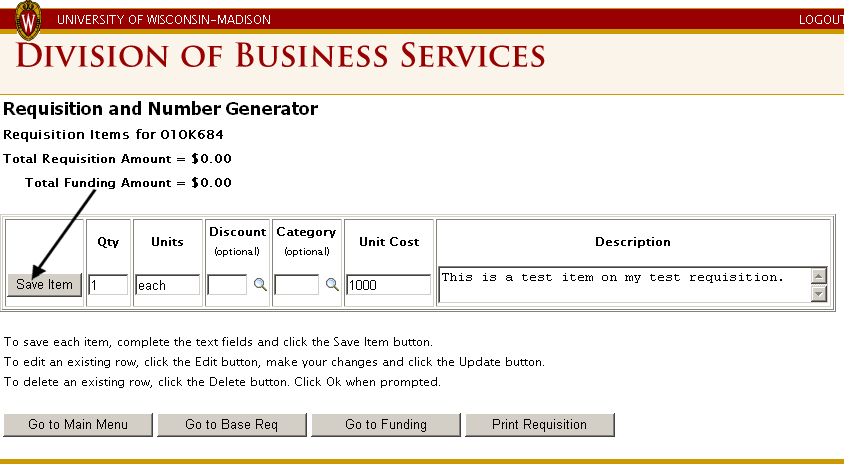
- The items screen allows you to add items to your requisition.
- The requisition number and total amount are displayed at the top. The dollar amounts are updated as items are added.
- Enter the quantity and units as shown below.
- The quantity must be in a whole number (no decimals or partial quantities are allowed) and cannot be a negative number.
- The units field is required. Common units used are EACH, TERM, and LOT.
- Following is an example of how to correctly and incorrectly enter quantity and units for a common item.
- The Discount and Category field are optional and do not need to be completed.
- If you need to enter a discount for a specific item then you can click on the magnifying glass to select a percentage discount that will be applied to that item only.
- If you would like a discount to be applied to the entire amount on the requisition (all the items), use the “Requisition Level Discount” box that appears on the previous screen above the Comments section.
- You may also apply a specific dollar amount discount using negative dollar amounts in the unit cost of the line item.
- Enter the cost of each item in the Unit Cost field
- Small numbers can either be entered as 0.20 or .20 as you prefer, but this field only allows the entry of up to two decimal places.
- Negative numbers (entered as -100 for example) may be used to indicate a discount.
- Enter your item description in the Description block. This field contains the text explaining what is being ordered from the vendor and may contain up to 2000 characters, but please be as concise as possible. Any comments to Purchasing should not be entered in the description field.
- For example, if a check needs to be sent along with the order, make sure to clearly indicate this in the Comments section on the previous screen.
- If you have a quote or long list of items, they may be attached to the paper copy, simply indicate "per attached quote" (as shown below) and be sure to send the information along with the printed requisition.
Qty
Units
Cost
Description
1
LOT
3950.25
Per attached quote #1234XYZ dated 9-30-2008
If there are 10 items or less on the quote, we recommend that you enter them directly in the requisition (or copy and paste) as this will electronically capture the information for future reference and cut down on paper used. Enter or copy one line at a time into separate lines on the requisition vs. putting the whole description into one line. If you are copying from another document, be sure not to copy any special or scientific characters that do not appear on a standard keyboard.
- If you are receiving a discount on the items listed, you may either enter them using the “per attached quote” method (as shown below),
Qty
Units
Cost
Description
1
LOT
3950.25
Per attached quote #1234XYZ dated 9-30-2008
Or by describing the item in its entirety and using the total discounted price (as shown below),
QtyUnits
Cost
Description
1
LOT
3950.25
Consulting Services including $100 discount provided on 9-30-2008 by John Smith
Or by entering the item at full price and then entering a line with a negative number to indicate the discount (as shown below).
QtyUnits
Cost
Description
1
LOT
4050.25
Per attached quote #1234XYZ dated 9-30-2008
1
LOT
-100.00
$100 discount provided on 9-30-2008 by John Smith
- When finished click the "Save Item" button at the left to save the item and add it to your requisition. If you do not click Save Item, no items will print.
- Once your item has been added, you may continue to enter as many items as necessary and the screen will appear as below
- The total will be updated each time an item is saved
- To make any changes to the item, choose "Edit" , but be sure to click the "Update" button to accept the changes
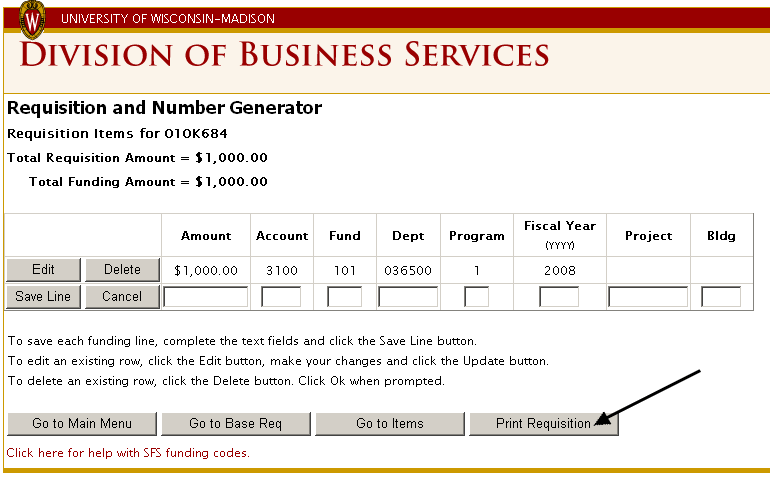
- Once you have entered all items, click "Go to Funding" to continue as shown below
- NOTE: Do not hand write any information on the requisition that has not been entered into the system. If the information is not in the system, we will not be able to get it on the order sent out to the vendor.
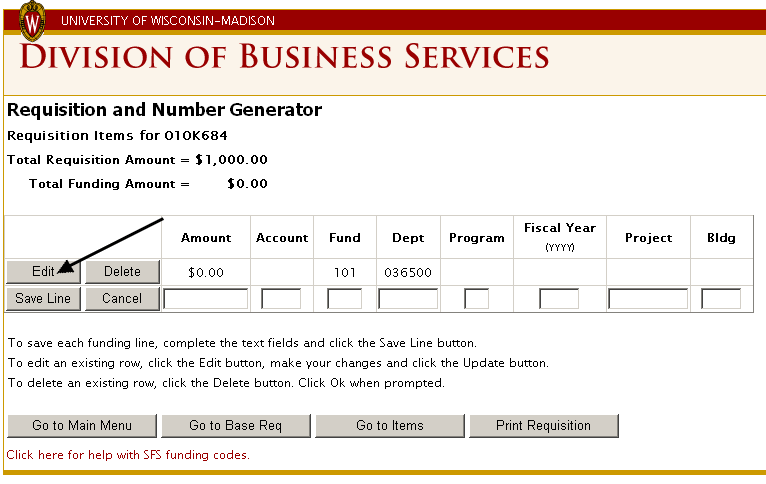
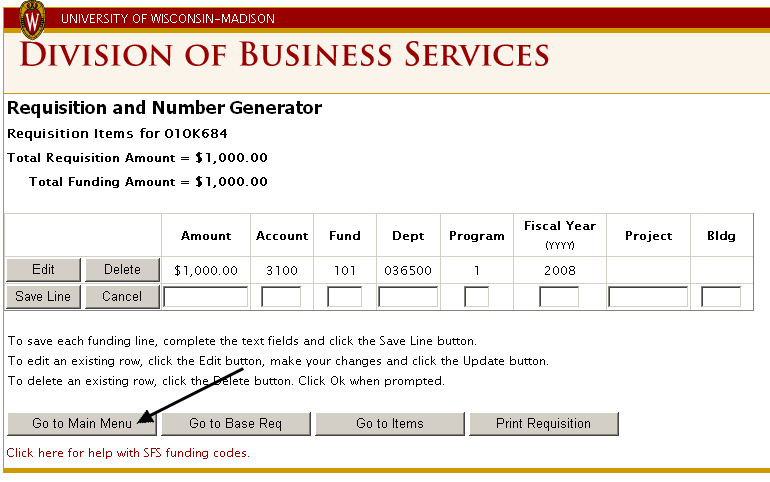
- The funding screen allows you to add funding strings to your requisition.
- The requisition number, total amount, and total funding amount are displayed at the top
- Any funding strings (or partial funding strings) that are saved in your preferences will appear automatically
- Choose "Edit" to make any changes/additions or begin typing in the blank row
- Enter the funding string to be used as detailed below. Be sure to use SFS coding (further information on SFS coding is available at http://www.bussvc.wisc.edu/acct/coding.html)
- Enter the amount to be spent on this funding string.
- Enter the appropriate 4 digit Account code which describes the category of items being purchased
- Enter the 3 digit fund number which describes your funding source (for example 233 for gift funds)
- Enter your 6 digit Department ID which is a number assigned to identify your department on campus (formerly called UDDS).
- Enter the 1 digit Program code which describes the type of program costs associated with your funding.
- Enter the 4 digit fiscal year, e.g. 2009 (The fiscal year runs from July 1 to June 30, so fiscal year 2009 is July 1, 2008 to June 30, 2009).
- Enter the 7 digit Project ID, if necessary, which describes your specific grant or other funding for this purchase.
- Do not enter the Bldg. number unless it is actually required for your purchase (there are very few account codes that require it).
- Once the funding string is entered be sure to choose "Update" or "Save Line" to save the funding and add it to you requisition. If you do not, no funding will appear on the printed requisition.
- Once you choose Update or Save Line, the funding string will be edited to make sure the the project, program, department ID, fund, and account are a valid combination of funding.
- If you receive any errors during the editing process, click on the help link at the very bottom of the page (below the gold bar) to be taken to http://kb.wisc.edu/helpdesk/page.php?id=7044 which links to detailed descriptions of error messages and who to contact for further assistance.
- Once the funding has been added, the total funding amount listed near the top of the screen will be updated.
- Do not proceed to print unless your total requisition amount and total funding amount match. Repair the error before printing and submitting the requisition as Purchasing will not be able to process requisitions where the total amount and total funding amount do not match.
- NOTE: Do not hand write any funding information on the requisition. Be sure that the requisition being submitted has funding information entered into the requisition generator as Purchasing will not be able to process the order without it.
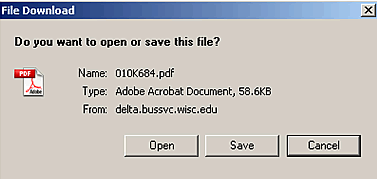
- A print dialog box (as shown below) will appear. Choose "Open" to open and print the document.
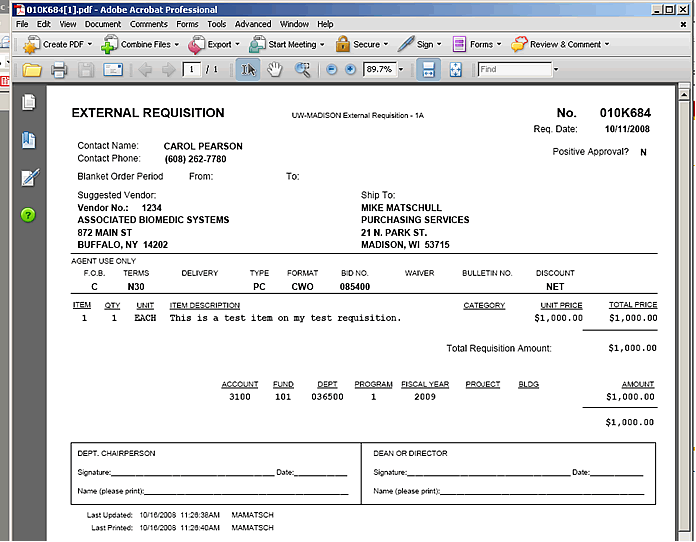
- Your final document will open in Adobe Acrobat (as below) and can be printed and saved. The file is automatically named as the requisition number (101k684.pdf in this example). Print the number of copies specified by your Dean's office and have the final requisition document routed and signed according to your Dean's office procedures.
- Close or save your requisition and then use the "Go to Main Menu" button at the bottom of the screen (shown below) to return to the main menu and create another requisition or use the other navigation buttons to make any changes to your requisition.
- For further information, see the Frequently Asked Questions or Obtaining Help for the Requisition Generator
Information entered here will appear on every requisition that you complete, but can be deleted or replaced if needed as the requisition is completed. You are not required to complete these preferences.
Qty |
Units |
Cost |
Description |
|
2.5 |
Hours |
100 |
Consulting services |
Wrong |
1 |
Lot |
250 |
2.5 hours of consulting services |
Correct |