Creating an Internal Work Order through the Requisition and Number Generator in My UW
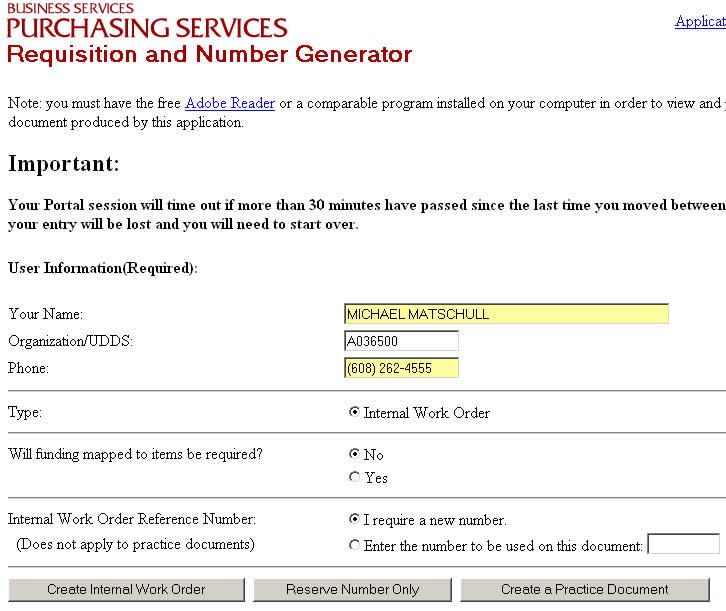
- This section of the application allows you to use the requisition generator to create and print an internal work order with a valid reference number assigned to it. Begin by choosing “Internal Work Order Generator ” from the Main Menu.

- Your name, UDDS, and phone number will be filled in automatically and the Internal Work Order option will be automatically checked. Choose if you will require a funding map. Then choose if you need to have a requisition number assigned or wish to enter your own from your block of numbers. Choose the “Create Internal Work Order ” button at the bottom of the screen to proceed.
- Entering Internal Work Order Information:
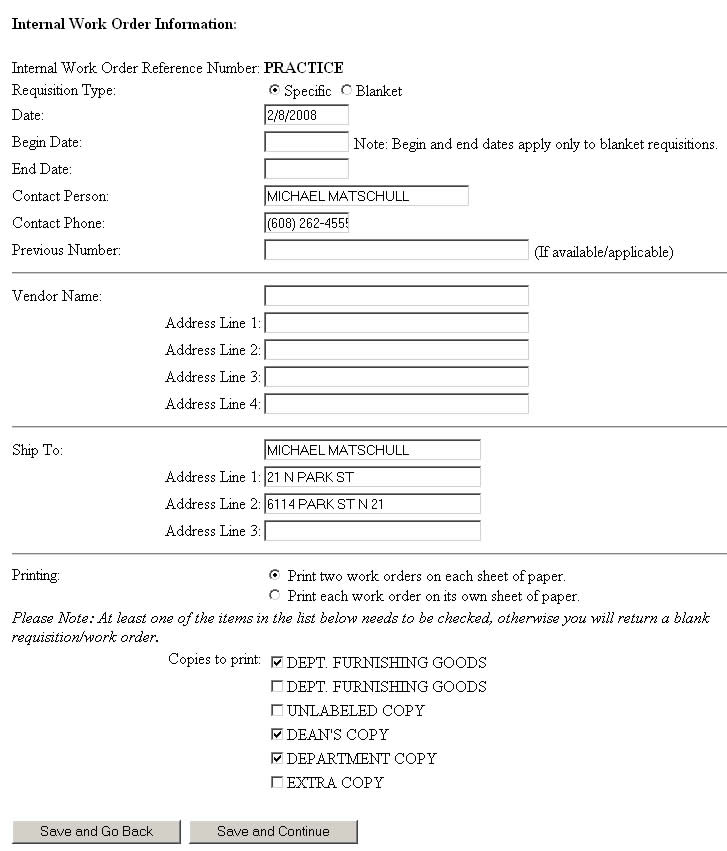
The screen below appears after choosing “Create Internal Work Order ” from the main menu and allows you to enter the general information.- The assigned reference number is listed at the top.
- Choose "Specific" as the Type for a single committment and Blanket for a recurring order.
- Today's date is defaulted into the date field.
- If choosing blanket, enter the date range in the Begin Date and End date fields.
- Enter the Contact Person and Contact Phone. Your name and phone should be automatically populated. The work order generator will remember the last values that you entered for these fields and will automatically fill them in when you complete your next work order.
- Enter the internal vendor which you will be receiving the goods/services from in the Vendor Name and Address lines.
- Enter the Ship To address for the order. Your name and address should be automatically populated. The work order generator will remember the last values that you entered for these fields and will automatically fill them in when you complete your next work order.
- Choose the number of copies to print as required by your Dean's office and the campus service provider. The defaults are the Department Furnishing Goods copy, the Dean's Copy, and the Department Copy.
- Choose Save and Continue to proceed.
- Entering Items and Funding Information:
The next page allows the entry of items and funding information. Each line is numbered automatically.
- Enter the Quantity, Unit, and Unit Cost for each item. The application will multiply the Unit Cost and Quantity to calculate both the Extended Cost and the Total Cost.
- Enter the Item Description in the “Item Description/Comment” box. The box can hold up to 800 characters and will automatically wrap the text on the final document.
- Choose “Add Another Line” to add as many items or messages as needed. An attached list will be automatically generated if necessary.
- To create a comment line or order message, leave the quantity box blank and enter the desired text in the “Item Description/Comment” field or select and customize one of the standard messages from the drop down box.
- To apply a discount to the whole work order, select the Document Level option from the Discount Type select box and enter the percent discount in the Document Level Discount field. Do not include the "%" symbol. For item level discounts, select Item Level from the Discount type select box and enter the percent discount in the Discount field for each item with a discount.
- Enter the funding information in the next set of boxes using SFS coding.
- Choose “Add More Funding” to add another funding string if needed.
- Funding amounts will be automatically added and an attached list will be generated automatically if necessary.
- The “Total Funding” and “Total Cost” fields should match before generating the printed document. The “Cost-Funding” field displays the difference, if any, and is provided as a reminder to help to ensure that the amounts match. If they do not, a warning message indicating so will appear before the final printable document is generated.
Since there is a calculation applied to this funding amount field, it will only take numeric values.

- Generating the Final Printed Internal Work Order
The final internal work order form, containing the specified number of copies, will appear in a new window. This document can be printed on your local printer and the Adobe Acrobat .pdf file can be saved if desired. If the new window does not appear, choose the “Open My Requisition” link to generate it. Note: Do not alter the way you process any of the paper forms without consulting your Dean ’s office for approval.
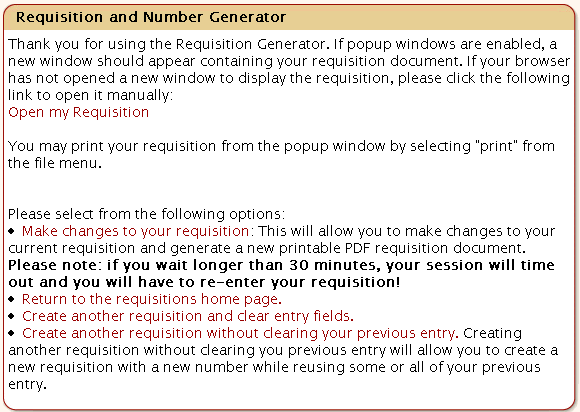
- Navigating Back to the Application
Once a work order has been successfully generated, a menu will appear outlining choices for returning to the application, and making changes to your form.
Use the “Open My Requisition” link if the printable Adobe Acrobat file has not appeared. This will manually open the window for you.
Use the “Make Changes to your requisition” link to go back and edit any of the information in your final requisition form if you notice a change needs to be made. This option is only available immediately after generating the printable form. Proofread the printed form immediately to determine if this option is needed, as it will not be available once you exit the application. If small changes are needed, such as adding an “F” to a funding line in a split funding situation, these may be written directly on the printed copy. A new copy does not need to be generated in these cases.
“Return to the requisitions home page” will take you back to the Main Menu of the application. “Create another requisition and clear entry fields” will begin the process of creating another form, but will wipe out the data you entered on the previous requisition. Use “create another requisition without clearing your previous entry” to create another form and leave all the items you just entered.